
Tuesday, August 26, 2008
Peter Pan Collar!
 This dress was done when i was still learning at kadomay's dressmaking. It was a princess cutting dress and this dress took far longer than the previous few that i showed so far. Thats because there is a collar and sleeves. Yes its those dreaded things. But i thought it would be quite nice with some peterpan styled collars and some short sleeves.
 The dress was slightly flared out which i thought the soft material would bring out nicely.
 Close up of the floral pattern on the fabric. It was embroidered on rather then printed which explains why the fabric was quite expensive.
 And the customary card that goes along!
 The dress in the nice box that i bought from ikea together with the handmade card!
posted by zIxU
11:32 AM
Sunday, August 17, 2008
Invisible Pockets!
 It is now almost a point to explore something new everything time i sew something and this time it was invisible pockets! This dress took about 30 hours to make, working on it on and off for the past 2 months. Anw, this was how it started out, but feedback from the future wearer said she wanted it sleeveless so the sleeves were removed. The hem line was supposed to be rounded but unfortunately i think i didn't draw the paper pattern to be distinct enough and it turned out not very obvious.
 Dress with the rough sketch.
 The connection point of the front and back at the hem line. This part was quite difficult to sew and make it continuous was the cloth tended to clump up at that point as it rises up and descends downwards instead of being even leveled for a normal hem line.
 Exterior View.
 As you can see, the rounded hemline just wasn't very distinct.
 Making the invisible pockets was the hardest part. Now that i have finished making the dress, then i realized that you actually have to plan before hand the existence of invisible pockets (Unless normal pockets where u can still just slap the on) and not attempt to cut slits after you already finish sewing the dress.
 Marking out the positions of the invisible pocket.
 I ended up cutting the slits using my 30 degree arki olfa penknife on a arki cutting mat.
 The slit was originally 12 cm, but in the process of making the pockets, the slits were accidently widened a little bit to 12.5 cm.
 I didnt take any pictures of the weird method in which i installed the pocket though.
 The invisible pocket when opened. There is this strip of cloth that you can see in this photo because the funny unorthodox method that i used to stop the top part of the pocket from freying inevitably caused that.
posted by zIxU
12:41 AM
Tuesday, August 12, 2008
SDE Rag Costumes!
SDE just had its rag day a few days ago, and it was a davestatingly sad day that we didnt win anything. But nevertheless it was great fun and very satisfying to sew the costumes for the dancers. We had 3 types of costumes - fairies, aliens and humans.
 Aliens during the static display.
 Standard issue alien (although he was carrying the Alien King's pole)
And the alien king (With 3 other raggers). He had tatoos on both his arms instead of just one and he also had this especially cool head gear. The "dreadlocks" were made from black painted plastic tubes attached to a hairband. 2 black elastic bands also had to be used to keep the headgear in place.
But to me, the most exciting costumes to make of all are of course the fairies, since we had to sew from fabric from scratch.
 Faries during the static judging portion during Rag Day. The pink colored faries are the standard issue ones, while the fairy in the maroon dress is the Fairy Godmother.
 Close up of the normal fairy. It was a simple tube dress with elastic sewed at the bust area. The wings were just white organza attached to the backpart of the dress and then tied to their fingers. They also made a tiara with a large pearl on it for them.

Closeup of the fairy godmother. I made the dress for her and also did the facepainting. A friend did up the tiara and it was modelled after the one that liv tyler wore for her role as Arwen and it was absolutely stunning. Anyway the dress was also a tube dress, but longer than the normal fairies. It was originally supposed to be spilling out onto the floor, but because of functional reasons (She had to dance), i had to sadly chop off some length so that it ends right after the ankle, and it became much less elegant. The bust area was not held up using elastic though, but it was done in the similiar method to a corset. I inserted a wire into it to maintain the shape, and i thought the V dip in the middle of the bust area added a nice touch to it.

I also added some beads/pearls of varying size/colors to the front. I wanted this diminishing effect, this dense centralized area in the middle and a slow trickling effect towards the bottom and the sides. These 2 pictures were taken in the process of sewing on those beads and it took approximately 3 hours to hand sew everything on. And it was seriously hell tiring and boring to be repetitively sewing the same thing. Haha.

Labels: Dresses
posted by zIxU
11:32 AM
Monday, August 11, 2008
Arki Drafting Top!


But i decided to make it sleeveless and collarless since i just wasn't in the mood to tackle those 2 things which are the hardest part of making any dress/top. I can't remember exactly why i choose to use that particular checkered pattern fabric though.
But anw, i decided to add an interesting touch to it, that is to include a front central pocket. It was my first time sewing pockets, so it was quite fun to experiment. But thats not just an ordinary pocket. Thats because the pocket is not one gigantic pocket but actually slots for 5 pens! Drafting pens to be precise. One for each particular pen thickness. You can see a 0.1mm, a 0.2mm, a 0.3mm, a 0.5mm and 0.7mm. When its all slotted in nicely, its really quite colorful!

Hairstylists always wear a pouch around their waist to store their scissors/tools and everything so i thought, hey can't you have the same concept as when your drafting your architecture panels? Pens always roll all over the place and when time is so precious, it would be nice if you know exactly where and where your pens are!
I didn't really take any in-the-process-of-making pictures, but i shall do so for future projects. In fact, i'm currently making a dress right now, and i already took quite a few pictures of some details while sewing the thing.
Oh and as this was a gift, there is always the customary 2D paper version of the dress with instructions and everything on it. Haha.

Ok its time to go off , especially since term starts once again tomorrow. I shall post pictures up of the fairy godmother costumes that i did for our SDE (School of Design and Environment)'s Rag soon!
Labels: Blouse
posted by zIxU
5:48 AM
Sunday, August 10, 2008
Tools of the trade
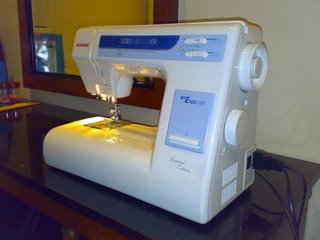 My trusty Janome sewing machine. Can't remember where my sister bought it, but it currently sells at Mustafa for abt 700 bucks.
 A close up view of where the actual creation takes place.
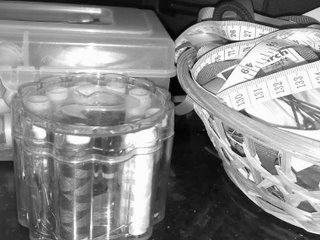
Where i store my tailor's chalk, measuring tape, needles, pins and stuff.
posted by zIxU
6:45 AM
First Post!
After scouring around the net for singaporean design/sewing blogs/websites, i come to the conclusion that there arnt any! Maybe there are and i just couldnt find them, but i've decided that it would be a good idea to start up one.
posted by zIxU
6:39 AM
Free Counter |